Create your own malware analysis lab
Table of Contents
The first thing in order to analyse malware is setting up a safe environment with a large set of tools that help you in this task.
As we do not want to infect our host system, we are going to use virtual machines without Internet connection. First of all, we are going to deploy an analysis machine which will have Windows as Operative System and a REMnux machine which will act as a DHCP server. The labs in Practical Malware Analysis (PMA) book are designed to be done with Windows XP but different Reddit users say that most of them can be done in Windows 7.
Hypervisor
There are different platforms that allow us to virtualize machines. For example, PMA Chapter 2 (Malware Analysis in Virtual Machines) suggest to use VMWare. It is a good option, nonetheless I will use VirtualBox as I am used to using it. In my case, I have installed VirtualBox 6.1.40 because it is the latest version available.
Virtual machines
Windows XP
If you want a copy, there is a Windows XP Service Pack version (32-bit) available on Archive.org
With 2 GB of RAM and 20 GB hard drive I think that it is enough. In this blog post you can find a list of tools that will be useful for future analysis. At the end of the post you can download them in a ZIP file and install them in your machine. PMA labs can be downloaded from here
Windows 7
First of all, we have to download an ISO file. In this subreddit I found an official Windows 7 Pro 64-bit disk image. You can download it here. In order to beat anti-analysis techniques such as anti-virtualization (long story short, malware that detects that it is inside a VM and modifies its behaviour to avoid being analysed) we are going to avoid installing Virtual Box Guest Additions. Apart from that, we are going to use several tools that try to hide the typical features that malware samples look for to check if they have landed in a virtualized environment.
Firstly, we are going to test our VM against Pafish. This tool performs a collection of checks and will tell us how real our lab is. In my opinion, Pafish is enough but al-khaser tool seems more complete and updated. This Reddit thread also sheds some light over this topic.
As our lab is going to fail in some tests, I am going to leave some tools in the following list that will allow us to conceal our sandbox. The first three projects were tested in this blog post but the outcome was not successful. That’s why the author implemented his own solution, which is VBoxAntiDetection. The last project was found in this blog post and although the post was written in 2016, the tool has been updated in 2021.
As we do not want to end up blind, we have to edit some settings to enlarge the VM screen. After that, we can start configuring our lab environment.
Hopefully, setting up a malware-analysis lab in Windows 7 is faster thanks to the Flare Team at Mandiant. They have developed Flare VM which is a wonderful tool that automates the creation of fully-working environment with a great set of tools. The specifications are described in the README repository, but I also attach some videos that show the process of installation.
- Flare VM GitHub repository
- Flare VM installation guide
- Malware Analysis Bootcamp - Setting Up Our Environment
- How to install FLARE VM
I have configured the VM with a 70 GB hard drive and 5 GB of RAM.
Upgrading FLARE VM
Although FLARE VM comes together with a lot of tools, some of them are missing such as Volatility and Ghidra. I attach some links to videos that will help you to boost your machine.
- How to Install FLARE VM in Windows 7 and Analyze Malware Using Volatility tool | Memory Forensics
- Installing additional missing tools for FLARE VM on Windows 10 virtual machine Although it says W10, we can apply the same steps to our W7 machine 😉
In order to install Ghidra you will have to install this before: OpenJDK 11 Installation on Windows 7 with JAVA_HOME | Java SE 11 (LTS) is Released | Java 11
Once we have installed Ghidra, we can customize it with some plugins in order to make it similar to IDA Pro. You can check more information about it here: Getting Started with Ghidra and FlareVM
Some other tools that will be really helpful are:
- Process Explorer
- Process Monitor
REMnux
This Linux distribution is designed for reverse engineering malware. Like Kali Linux is thought to be used for pentesting, REMnux contains a lot of useful tools for this task without spending the time installing them. Anyway, you have the option to use other Linux distributions and custom them with the tools that you like. We are going to use REMnux for network forensics.
Download REMnux at the official page
Environment
Once we have installed all the tools, do not forget to set your network adapter to “Host-only”.
⚠️After researching more about creating your own malware lab I have read that Host-only network is not a good solution although there are multiple tutorials that suggest this type of network. The best option is to create a subnet in order to avoid possible infections with our host machine. More information for how to proceed here.
Once, you have assigned an IP address to your REMnux machine and to your Windows machine, change the DNS server to point to the REMnux machine.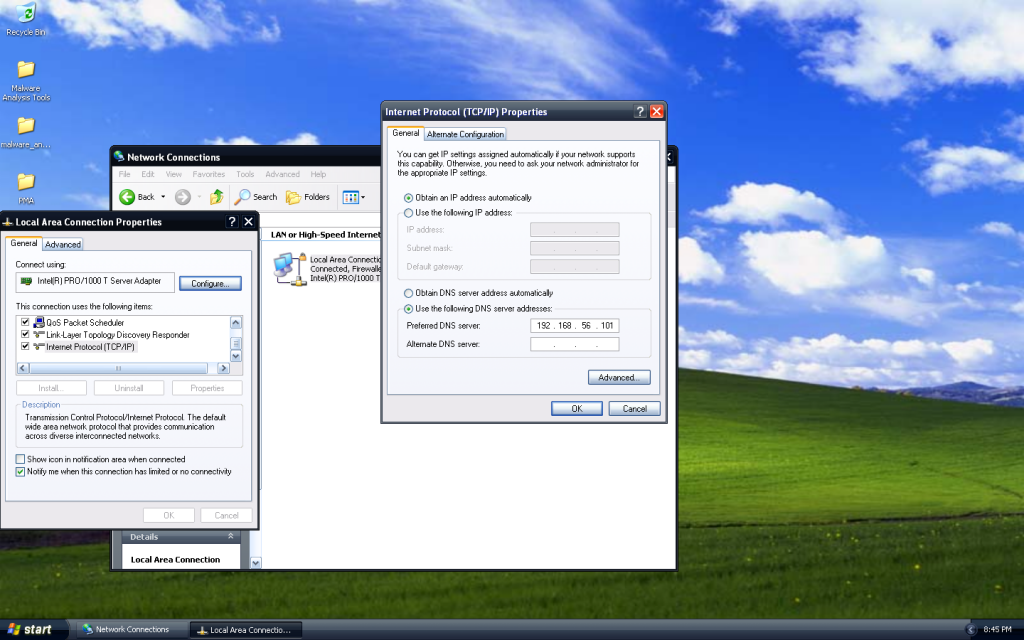
Changing the DNS server through the Control Panel - ihack.blue
- Remember also to take a snapshot from the machines, so you can revert to the original state after infecting your machine during the analysis.
- Shared folders in Read-only mode. I am not 100 % sure about this one in terms of security. There are some options that include INetSim for transferring files to the victim machine or SFTP although this one is not available if we choose a virtual network for our machines. SMB option